
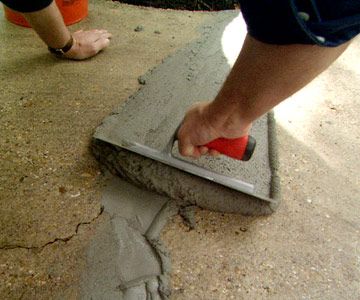
That long crack running across your driveway is not just an eyesore. It is a slow-moving problem. Water gets inside, freezes in winter, expands, and turns a small concrete drive repair into a big, expensive replacement. The good news? Most driveway concrete repair jobs are completely doable on a weekend if you catch the damage early.
I have spent years creating DIY content, and I can tell you this: homeowners often overestimate how hard concrete driveway repair really is. With the right materials and a little patience, you can repair concrete driveway cracks, patch holes, and even resurface the top layer without hiring a pro.
This guide walks you through every step. Keep it simple. Keep it safe. Let’s fix that driveway.
Tools and Materials You’ll Need
Before you start, gather everything. Nothing kills momentum like running to the hardware store mid-repair.
Tools
-
Pressure washer or stiff-bristle brush and hose
-
Wire brush
-
Cold chisel and hammer
-
Putty knife or margin trowel
-
Caulking gun
-
Mixing bucket and drill with paddle attachment
-
Broom or leaf blower
-
Safety glasses, gloves, and a dust mask
Materials
-
Concrete crack filler or pourable concrete caulk
-
Polymer-modified patching compound
-
Backer rod for deep cracks
-
Concrete bonding adhesive
-
Concrete resurfacer, if needed
-
Concrete sealer
Most of these products are available at any home improvement store in the USA. Look for terms like “polymer-modified” on the label. That means the product is designed to flex and bond better than plain cement.
Step 1: Inspect and Diagnose the Damage
Walk your driveway slowly. Not every crack is the same.
-
Hairline cracks: Thin, surface-level lines. Usually cosmetic.
-
Shrinkage cracks: Slightly wider, caused by concrete drying too fast.
-
Spalling: The top layer flakes or chips away.
-
Settlement cracks: One side of the crack is higher than the other. This points to soil movement underneath.
For a simple concrete drive repair, hairline cracks, shrinkage cracks, and small spalling are all fair game. If you see a crack wider than 1/2 inch, or if one slab has dropped noticeably, the base may be failing. In that case, a patch will only be temporary. Call a concrete contractor for an evaluation.
Step 2: Clean and Prepare the Surface
This is the most boring step, but it is also the most important. If you skip cleaning, your repair will peel or crumble within months.
Start by removing all loose debris. Use a pressure washer if you have one. If not, a stiff-bristle brush and a garden hose will work. For oil stains, use a degreaser. For old paint or sealer, use a wire brush.
After cleaning, let the concrete dry completely. A damp surface is fine for some products, but standing water is not. Check the product label.
Pro tip: If you are repairing a crack, use a screwdriver or chisel to remove any loose chips inside the crack. You want a clean, solid edge.
Step 3: Repair Small Cracks
Small cracks under 1/4 inch wide are the easiest part of concrete drive repair.
-
Insert a foam backer rod into the crack if it is deeper than 1/2 inch. This saves filler and helps the repair flex.
-
Load a tube of concrete crack filler into your caulking gun.
-
Apply the filler slowly along the crack. Slightly overfill it because it will shrink a little as it cures.
-
Smooth the top with a putty knife.
-
Let it dry according to the label, usually 24 hours.
This is a perfect weekend fix concrete driveway project. It costs less than $30 and can add years to your driveway.
Step 4: Fix Larger Cracks and Holes
Wider cracks and small holes need a patching compound instead of a liquid filler.
Here is the process.
-
Undercut the edges: Use a cold chisel and hammer to make the bottom of the crack slightly wider than the top. This locks the patch in place.
-
Apply bonding adhesive: Brush a thin layer of concrete bonding adhesive into the crack. This helps the new patch stick to the old concrete.
-
Mix the patching compound: Follow the instructions. You want a thick, peanut-butter-like consistency.
-
Fill in layers: For deep repairs, apply the patch in 1/4-inch layers. Let each layer set slightly before adding the next.
-
Smooth and feather: Use a trowel to smooth the patch and feather the edges into the surrounding concrete.
Do not rush this. A well-done patch should look flat and blend in with the rest of the driveway.
Step 5: Resurface or Seal the Driveway
If your driveway has widespread spalling or a rough, pitted surface, patching individual spots will not look great. That is when you need a concrete resurfacer.
Concrete resurfacer is a special mix that goes on in a thin layer and bonds to the existing slab. It creates a fresh, smooth surface.
Here is how to apply it.
-
Prep the entire driveway: Clean it thoroughly and remove all loose material.
-
Dampen the surface: The concrete should be slightly damp but not puddled.
-
Mix the resurfacer: Use a drill and paddle. Aim for a pourable, syrup-like consistency.
-
Pour and squeegee: Work in small sections. Pour the resurfacer and spread it with a long-handled squeegee.
-
Finish with a broom: Lightly drag a broom over the wet surface to add slip resistance.
-
Let it cure: Keep foot traffic off for at least 24 hours and vehicle traffic off for 3 to 7 days.
After resurfacing, apply a concrete sealer once the surface has fully cured. Sealer protects against water, salt, and UV damage.
Step 6: Cure and Maintain
Curing is not the same as drying. Concrete needs moisture to reach full strength. If it dries too fast, it can crack again.
-
Keep the repaired area damp by misting it lightly with water for the first few days, especially in hot weather.
-
Do not park on the repaired area for at least 7 days.
-
Avoid heavy loads during the first month.
For long-term maintenance, seal your driveway every 2 to 3 years. Clean it regularly. Remove oil stains quickly. The longer you wait, the more likely a small concrete drive repair becomes a big job.
Common Mistakes to Avoid
I see these mistakes all the time.
-
Skipping surface prep: Dirt and loose concrete are the number one reason patches fail.
-
Using the wrong product: Do not use general-purpose mortar for driveway cracks. Use a polymer-modified product.
-
Ignoring drainage: If water pools on your driveway, fix the drainage first. Otherwise, your repair will fail from the bottom up.
-
Applying filler to a wet crack: Most products need a dry surface. Read the label.
-
Rushing the cure: Driving on fresh repair too soon ruins the bond.
Avoid these, and your concrete driveway repair will last much longer.
Cost and Time Expectations
A basic concrete drive repair for small cracks costs between $20 and $60. Larger patching jobs may run $50 to $150. A full resurfacing project can cost $300 to $700 for a typical two-car driveway, depending on the product.
Time-wise, small cracks take about an afternoon. Patching holes takes a day plus drying time. Resurfacing takes a full weekend, including prep and curing.
Compare that to a full driveway replacement, which often costs $3,000 to $7,000. Suddenly, an afternoon of concrete drive repair feels very worthwhile.
Conclusion
You do not need to be a professional to handle most concrete driveway repair projects. Start small. Diagnose the damage honestly. Clean the surface well. Use the right product for the crack or hole. Then give the repair time to cure.
A driveway is one of the first things people notice about your home. Fixing it is not just about looks. It is about protecting your investment and preventing bigger problems later. With this step-by-step guide to concrete drive repair, you have everything you need to get started this weekend.So grab your gloves, clear your Saturday, and take care of that concrete. Your driveway will thank you.